Battery switch on travel trailer function is crucial for managing your RV’s power. Understanding how these switches work—whether single-pole, double-pole, or dual-battery—is key to preventing electrical issues and maximizing your off-grid adventures. This guide breaks down the types of switches, wiring diagrams, troubleshooting tips, and safety precautions, empowering you to confidently handle your travel trailer’s electrical system.
We’ll cover everything from selecting the right switch for your setup to performing routine maintenance, ensuring your power stays on when you need it most. Learn to diagnose problems, prevent corrosion, and safely replace a faulty switch, keeping your RV adventures running smoothly.
Types of Battery Switches in Travel Trailers
Choosing the right battery switch for your travel trailer is crucial for managing power and preventing issues. Different types offer varying levels of control and complexity, each suited to different needs and setups. Understanding these differences will help you select the best option for your specific situation.
Single-Pole Battery Switches
A single-pole battery switch is the simplest type. It controls the power flow from a single battery to the trailer’s electrical system. It’s essentially an on/off switch, disconnecting the battery from the trailer’s circuits when turned off. This prevents parasitic drain on the battery when the trailer isn’t in use. They are inexpensive and easy to install, making them a popular choice for trailers with a single battery.
Double-Pole Battery Switches
Double-pole switches offer more control. They allow you to switch between two separate battery banks (e.g., one house battery and one starting battery). This is useful for managing power from different sources, such as solar panels charging one bank and the alternator charging another. A double-pole switch allows you to isolate each battery bank independently or combine them for increased capacity.
Dual-Battery Switches
These switches, sometimes referred to as dual-battery selector switches, are specifically designed to manage two batteries. Similar to a double-pole switch, they enable switching between individual batteries or connecting both in parallel. However, dual-battery switches often include additional features like a “both” position to combine the batteries, offering more flexibility than a simple double-pole switch in a two-battery setup.
They typically incorporate better safety features and clearer labeling than simpler switches.
Comparison of Battery Switch Types, Battery switch on travel trailer function
| Feature | Single-Pole | Double-Pole | Dual-Battery |
|---|---|---|---|
| Number of Batteries Controlled | One | Two or more (depending on configuration) | Two |
| Functionality | On/Off for one battery | Independent control of multiple batteries or combined use | Individual or combined use of two batteries |
| Cost | Low | Medium | Medium to High |
| Complexity | Low | Medium | Medium |
| Pros | Simple, inexpensive, easy to install | Greater control over multiple batteries | Designed specifically for two-battery systems, often with safety features |
| Cons | Limited to one battery | Can be more complex to wire | More expensive than single-pole switches |
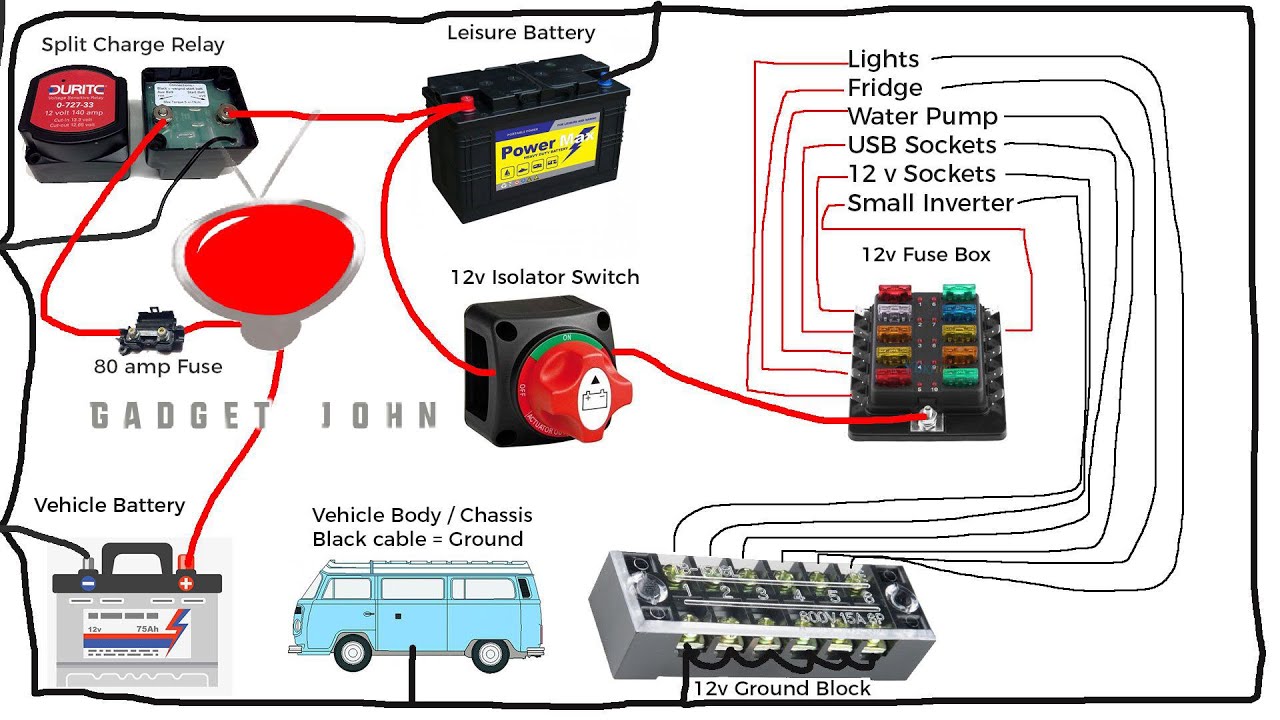
Battery Switch Wiring Diagrams and Schematics
Understanding how to wire a battery switch in your travel trailer is crucial for managing your power system effectively and safely. This section will walk you through typical wiring diagrams, highlighting key components and considerations for both dual-battery setups and systems incorporating solar panels. We’ll also cover troubleshooting common issues.
Dual-Battery Setup Wiring Diagram
A typical dual-battery setup uses a battery switch to isolate or combine the house battery (powering appliances) and the starting battery (for the tow vehicle). Imagine two batteries, labeled “House Battery” and “Starting Battery,” each with positive (+) and negative (-) terminals. The battery switch will have at least three positions: “Both,” “House,” and “Off.”In the “Both” position, both batteries are connected in parallel, providing combined power.
In the “House” position, only the house battery powers the trailer’s appliances. The “Off” position disconnects both batteries, preventing drain. The wiring involves connecting the positive terminals of both batteries to the input terminals of the switch. The output of the switch’s “Both” and “House” positions then feeds the trailer’s 12V system. The negative terminals of both batteries are usually connected directly to the trailer’s chassis (ground).
A correctly wired diagram would show a clear path for current flow in each switch position.
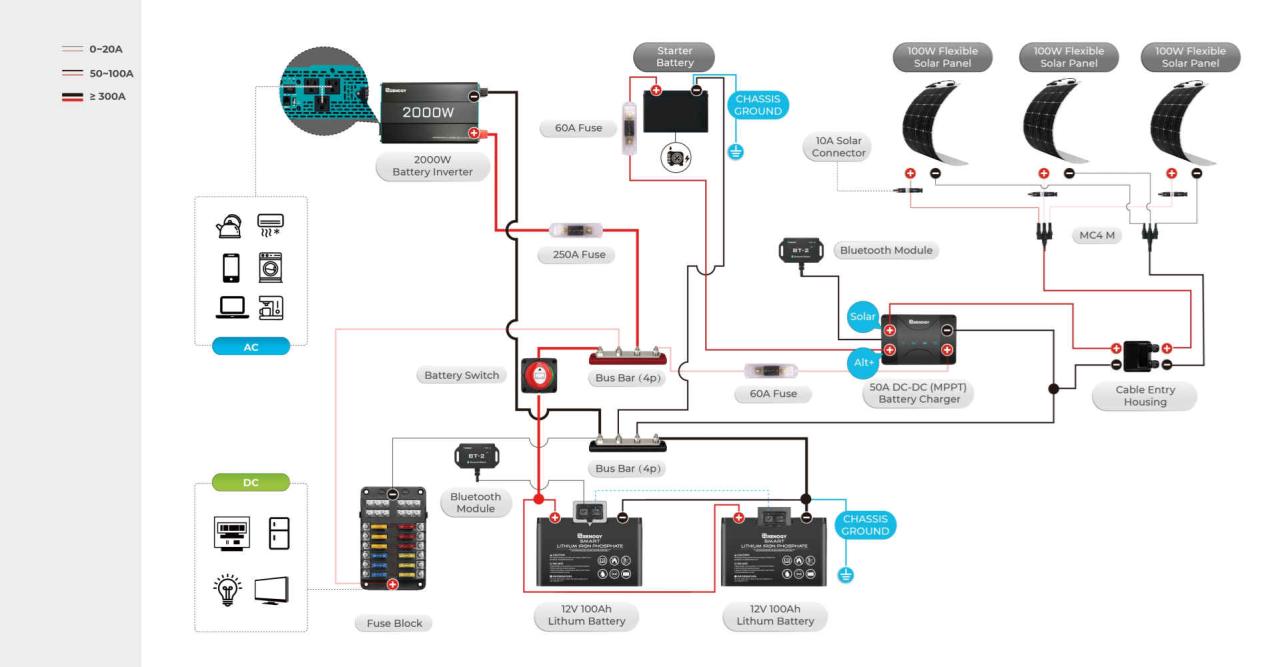
Solar Panel Integration Wiring Diagram
Adding a solar panel system enhances your travel trailer’s power capabilities. The solar panel’s positive wire connects to a solar charge controller. This controller regulates the voltage and current from the solar panel to prevent overcharging the house battery. The output of the charge controller connects to the positive terminal of the house battery. The negative wire from the solar panel connects directly to the negative terminal of the house battery.
So, you’re planning a trip? Awesome! Before you jet off, remember travel insurance is key. Check out aon travel insurance for high-end coverage options if you’re going all out on a luxury getaway. But if you’re on a tighter budget, aon travel insurance also offers solid plans that fit various needs and price points – it’s all about finding the right fit for your trip.
Don’t leave home without it!
The battery switch then manages the power flow from the house battery to the trailer’s electrical system. This setup ensures that the solar panel charges the house battery regardless of the battery switch’s position, except for the “Off” position.
Safety Considerations and Best Practices
Proper wiring is paramount for safety. Always use appropriately sized wires and fuses to protect the system from overloads and short circuits. Marine-grade wire is recommended for its resistance to corrosion and harsh environments. Use appropriately sized fuse holders and fuses in the positive wire leading from the batteries to the switch and from the switch to the trailer’s power distribution.
Crimp connectors should be properly sized and crimped to ensure a solid connection, preventing heat buildup and potential fire hazards. Always disconnect the negative terminal of the batteries before performing any wiring work. Label all wires clearly for easy identification and future maintenance. Never overload the system beyond the rated capacity of the wiring, fuses, and battery switch.
Troubleshooting a Malfunctioning Battery Switch
If your battery switch isn’t functioning correctly, follow these steps:
1. Visual Inspection
Check all connections for corrosion, loose wires, or damage. Tighten any loose connections and clean any corrosion.
2. Voltage Testing
Use a multimeter to check the voltage at each battery terminal and at the output of the battery switch in each position. Compare these readings to the expected voltage (around 12.6V for a fully charged battery).
3. Switch Operation
Verify the switch itself is operating correctly by moving it through all positions and checking for continuity with a multimeter.
4. Fuse Check
Inspect all fuses in the circuit for any signs of blowing. Replace any blown fuses and investigate the cause of the failure.
5. Wiring Trace
If problems persist, carefully trace the wiring from the batteries to the switch and from the switch to the trailer’s system to identify any breaks or shorts.
Troubleshooting Common Battery Switch Issues
Your travel trailer’s battery switch is a critical component, ensuring you can seamlessly switch between your house batteries and your tow vehicle’s charging system. Problems with this switch can leave you stranded without power. Understanding common issues and how to diagnose them is crucial for maintaining your RV’s electrical system.Troubleshooting a faulty battery switch involves systematically checking for several potential problems.
This often requires basic electrical knowledge and the use of a multimeter to measure voltage and continuity. Remember to always disconnect the negative battery terminal before working on any electrical components in your RV to prevent accidental shocks or short circuits.
Identifying Common Battery Switch Problems
Several issues can affect the proper functioning of your battery switch. Corrosion on the terminals is a frequent culprit, hindering the flow of electricity. Loose connections, often caused by vibration during travel, can also interrupt the circuit. Finally, the switch itself might fail due to wear and tear or internal damage. Regular inspection and preventative maintenance can significantly reduce the likelihood of these problems.
So, you’re planning a trip? Awesome! Don’t forget travel insurance! Check out Aon travel insurance for high-end coverage if you’re going all out. But if you’re on a tighter budget, Aon travel insurance also offers more budget-friendly options. Comparing both is a smart move to find the best fit for your adventure and peace of mind.
Remember to read the fine print before committing!
Diagnosing a Faulty Battery Switch
Using a multimeter is key to diagnosing battery switch problems. First, check the voltage at the battery terminals to confirm the batteries are charged. Then, measure the voltage at the output terminals of the switch. A significant voltage drop indicates a problem within the switch or its connections. Next, check the continuity of the switch itself by setting the multimeter to the continuity test mode.
With the switch in the “on” position, you should get a continuous tone indicating a closed circuit. If not, the switch is likely faulty. Always follow your multimeter’s instructions carefully. For example, when testing continuity, a typical multimeter will beep when it detects a closed circuit, indicating good conductivity. If there’s no beep, that suggests a break in the circuit.
Cleaning and Maintaining Battery Switch Connections
Corrosion is a major enemy of electrical connections. To clean corroded terminals, use a wire brush or sandpaper to remove any buildup. A baking soda and water paste can also be effective. After cleaning, apply a dielectric grease to the terminals to prevent future corrosion and improve conductivity. Tighten all connections securely.
This preventative maintenance should be part of your regular RV maintenance schedule. Remember, a clean and well-maintained battery switch will significantly extend its lifespan and improve the reliability of your RV’s electrical system.
Troubleshooting Guide
A well-organized troubleshooting guide can help you quickly identify and resolve battery switch problems.
- Problem: No power to the house batteries.
- Possible Causes: Faulty switch, corroded terminals, blown fuse, loose connections.
- Solution: Check the switch position, inspect and clean terminals, check fuses, and tighten all connections. Use a multimeter to check voltage and continuity at each point.
- Problem: Intermittent power to the house batteries.
- Possible Causes: Loose connections, corroded terminals, failing switch.
- Solution: Tighten all connections, clean terminals, and replace the switch if necessary. Pay close attention to any points of contact that appear loose or show signs of corrosion.
- Problem: Battery switch is stuck in one position.
- Possible Causes: Mechanical failure of the switch, corrosion hindering movement.
- Solution: Try lubricating the switch mechanism with a suitable lubricant. If this doesn’t work, the switch will likely need to be replaced.
Battery Switch Safety and Maintenance: Battery Switch On Travel Trailer Function
Regular inspection and maintenance of your travel trailer’s battery switch are crucial for preventing electrical hazards and ensuring the longevity of your battery system. Neglecting this can lead to dangerous situations, including electrical shocks, fires, and costly repairs. This section Artikels essential safety procedures and maintenance practices to keep you and your RV safe.Proper maintenance of your battery switch is essential for preventing problems and ensuring the safety of your electrical system.
A poorly maintained switch can lead to corrosion, overheating, and even failure, potentially causing damage to your batteries or other components. Regular cleaning and inspection are key to avoiding these issues.
Safety Precautions When Working with Battery Switches
Working with electrical systems, especially those involving batteries, requires caution. Always disconnect the negative (-) battery cable before working on any part of the system, including the battery switch. This will prevent accidental short circuits and shocks. Wear safety glasses to protect your eyes from potential sparks or corrosive battery acid splashes. Never work on the electrical system while it’s raining or in damp conditions, as this significantly increases the risk of electrical shock.
If you are unsure about any aspect of the procedure, consult a qualified RV technician. Remember, safety should always be your top priority.
Replacing a Faulty Battery Switch
Replacing a battery switch is a straightforward process, but safety is paramount. First, disconnect both the positive (+) and negative (-) battery cables. Next, carefully remove the old switch from its mounting location, noting the wire connections before disconnecting them. Use a wire brush to clean the terminals and ensure a good connection for the new switch.
Install the new switch securely in the mounting location and reconnect the wires exactly as they were before, ensuring a tight connection. Finally, reconnect the battery cables, starting with the positive (+) and then the negative (-). Test the switch to ensure it functions correctly.
Routine Battery Switch Maintenance Checklist
A simple checklist can help ensure your battery switch remains in optimal condition. Regular maintenance will extend its lifespan and prevent potential problems.
- Visual Inspection: Check for any signs of corrosion, loose connections, or physical damage to the switch or wiring. Look for any discoloration or buildup around the terminals.
- Cleaning: Use a wire brush or terminal cleaner to remove any corrosion from the switch terminals and battery posts. A baking soda and water paste can also be effective.
- Connection Tightness: Ensure all wire connections are tight and secure. Loose connections can lead to overheating and resistance.
- Functional Test: Regularly test the switch to ensure it properly connects and disconnects the batteries. Use a multimeter to verify the continuity of the circuit.
- Environmental Protection: Keep the switch and its surroundings clean and dry to prevent corrosion. Consider applying a dielectric grease to the terminals to protect against moisture.
Regularly following this checklist will help maintain the efficiency and safety of your battery switch, preventing potential problems and ensuring a reliable power supply for your travel trailer.
Selecting the Right Battery Switch for Your Travel Trailer
Choosing the right battery switch is crucial for safely managing your travel trailer’s power. A properly sized and installed switch protects your batteries and electrical system, ensuring reliable power for your appliances and accessories. The wrong switch can lead to overheating, damage, and even fire hazards. Let’s explore the key factors to consider.
Factors to Consider When Choosing a Battery Switch
Several factors influence the selection of an appropriate battery switch. These include the amperage rating, the number of batteries in your system, and the type of switch best suited to your needs. Ignoring these can lead to a poorly performing or unsafe system.
- Amperage Rating: The switch’s amperage rating must exceed the maximum current draw of your trailer’s electrical system. Underestimating this can cause the switch to overheat and fail. For example, a system drawing 100 amps needs a switch rated for at least 150 amps to provide a safety margin.
- Number of Batteries: The number of batteries determines the type of switch needed. A single battery system requires a simple on/off switch, while dual or multiple battery systems benefit from switches that allow individual battery control and combined use.
- Type of Switch: Several switch types exist, each with its advantages and disadvantages. These include simple on/off switches, rotary switches offering various combinations of battery use, and more sophisticated electronic switches with remote control capabilities. Consider your needs and budget when selecting the appropriate type.
Comparing Battery Switch Brands and Models
The market offers a range of battery switches from different manufacturers, each with varying features and price points. Direct comparisons are difficult without specific models in mind, but some popular brands include Blue Sea Systems, Perko, and Sterling Power. These brands generally offer robust, reliable switches with varying amperage ratings and features, like illuminated indicators or remote control capabilities.
Researching specific models from these brands, based on your amperage and battery configuration needs, will help you find the right fit. For instance, Blue Sea Systems offers a wide range of rotary switches, while Perko might specialize in more rugged, marine-grade options.
Battery Switch Installation Process
Installing a battery switch requires basic electrical knowledge and adherence to safety precautions. Incorrect installation can lead to electrical shorts, damage to equipment, or even injury.
- Disconnect the Battery: Always disconnect the negative terminal of your battery before beginning any electrical work.
- Gather Tools and Materials: You’ll need appropriate wire connectors, crimping tools, a wrench or socket set, and possibly a drill and appropriate sized drill bit depending on your mounting location. Always use wire connectors suitable for the amperage rating of your wiring.
- Mount the Switch: Securely mount the switch in a convenient and accessible location. Ensure the switch is well-ventilated to prevent overheating.
- Wire the Switch: Connect the wires according to the manufacturer’s instructions and wiring diagram. Ensure all connections are secure and properly insulated. Use appropriately sized wire for the amperage involved.
- Reconnect the Battery: After all connections are made, carefully reconnect the battery’s negative terminal.
- Test the Switch: Thoroughly test the switch to ensure all circuits are working correctly and that your batteries are charging and discharging as expected.
Battery Switch Mounting Options
Several mounting options exist, each with its pros and cons. The best option depends on your trailer’s layout and your personal preference.
- Panel Mount: This is the most common method, involving mounting the switch directly onto a panel or surface using screws or bolts. This provides a clean and easily accessible installation.
- Surface Mount: Similar to panel mount, but often with a slightly less flush installation. This option is suitable for locations where panel cutting isn’t feasible.
- Flush Mount: This requires cutting a hole in a panel to allow the switch to sit flush with the surface. This provides a cleaner look but requires more precise installation.
Mastering your travel trailer’s battery switch is a significant step towards confident RV ownership. By understanding the different types of switches, their wiring, and troubleshooting techniques, you can avoid costly repairs and ensure a safe and enjoyable camping experience. Regular maintenance and safety precautions are paramount; this guide provides the knowledge you need to keep your power flowing smoothly on the road.
Question Bank
Can I use a battery switch with a lithium battery?
Yes, but you need a switch specifically designed for lithium batteries, as they have different voltage and charging requirements than lead-acid batteries. Check the manufacturer’s specifications.
How often should I inspect my battery switch?
Ideally, inspect your battery switch every three months or before each extended trip. Check for corrosion, loose connections, and signs of damage.
What size battery switch do I need?
The amperage rating of your battery switch should be higher than the maximum current draw of your appliances. Consult your RV’s electrical system documentation or a qualified electrician.
My battery switch is making a clicking noise. What’s wrong?
A clicking noise often indicates a faulty switch or a problem with the wiring. Check for loose connections, corrosion, and blown fuses. If the problem persists, consult a professional.
